SMART Science
December 2008
Crystal Snowflakes
Do you enjoy snow? Do you sometimes wish it would last longer? Snowflakes have become a symbol of winter and a decoration for Christmas. You can make a model of a snowflake that lasts the entire winter season. You can use the model snowflake as a Christmas tree decoration or to hang in the window and catch the sunlight of a cold winter afternoon.
To make this model snowflake, you will need:
1) Several white pipe cleaners
2) Scissors
3) Wide mouthed jar
4) Boiling water (You will need an adult to help with this part!)
5) Borax (available in laundry detergent aisle of grocery store)
6) Pencil
7) String
Here is what you will need to do:
1) Cut the pipe cleaner into three pieces of equal length. Have your parents help you (pipe cleaners can be sharp!)
2) Twist the three pieces of pipe cleaner together into a shape with six points (all snowflakes have six points—see OVPM SMART Science in December 2007).
3) Tie a string around your “snowflake skeleton” and try to fit your snowflake into the jar you have chosen. If the snowflake is too big, try to find a wider mouth jar. You could also trim your pipe cleaner sections.
4) When you have a jar that fits your snowflake, begin heating some water. Ask your parents or an adult to help you. Bring the water to a boil.
5) You should heat enough water to cover your snowflake when it hanging in the jar.
6) Ask an adult to pour the very hot water into your jar.
7) Add borax and stir until no more borax dissolves. This means your solution is saturated. Saturated solutions work best for your crystal growth. Using hot water will make the solution saturated.
8) Place the pipe cleaner snowflake attached to the string and the pencil into the jar of saturated borax solution. Place the pencil across the jar’s mouth so the snowflake does not fall to the bottom of the jar. Be sure the pipe cleaner snowflake does not touch the sides or bottom of the jar. Adjust the string length if needed.
9) Wait until the next day (don’t disturb the snowflake!) and see what happens.

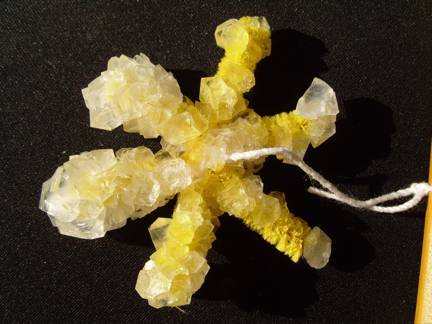
One of the reasons hot water is used is because more borax dissolves in the hot water than in cooler water. As the water cools, crystals begin to form because fewer crystals remain in solution at cooler temperatures. The solution is more easily saturated at cool temperatures. Saturated means no more crystals will dissolve in the solution. As your borax solution cools, the crystals come out of the solution and “grow” on the surface of the pipe cleaner.
You can experiment with different solutions for this activity. Try substituting sugar, Epsom salt, or table salt. Does it take longer for some crystals to form? Do the crystals all look the same? Try different color pipe cleaners. Make different size snowflakes.
Snowflakes are made of ice crystals, not borax or table salt, but this model will help demonstrate that snowflakes have six points. A photographer named Wilson A. Bentley learned about a snowflake’s geometry and that snowflakes are unique and beautiful. His collection of photographs may be viewed at www.snowflakebentley.com. He became so famous for his snowflake photographs that he was known as Snowflake Bentley!
Robert E. Strong is the director of the West Liberty
State College SMART-Center, the hands-on science center of the Northern Ohio
Valley. Libby Strong is the
Program Coordinator at the West Liberty State College SMART-Center and also
directs the WV-Handle On Science Program that brings hands-on science kits to
the public school classrooms of the Northern Panhandle. Richard Pollack is the assistant
program coordinator, webmaster, and technology specialist for the WLSC
SMART-Center. Robert, Libby, and
Richard invite you to visit the website at www.smartcenter.org